Comprehensive Verification of the RISC-V Memory Management Unit: Challenges and Solutions
Authors: Huda Sajjad, 10xEngineers, Pakistan, Hammad Bashir, 10xEngineers, Pakistan, Fatima Saleem, 10xEngineers, Pakistan, Umer Shahid, 10xEngineers, Pakistan
Abstract
The Memory Management Unit plays such an integral part in designing modern processors, enabling efficient memory translation and protection. However, its complexity and flexibility make it a vital component that requires extensive verification. This includes verifying both its architecture and micro-architecture. The major objective of the verification process is to ensure compliance with the system’s design specifications.This case study explores the comprehensive verification of the MMU within the RISC-V architecture, focusing on unique strategies employed to validate its behavior in various modes and configurations, highlighting key verification challenges and solutions, particularly in the context of RISC-V’s scalable and customizable Instruction Set Architecture (ISA)
MMU
The Memory Management Unit (MMU) is a crucial hardware component in computer systems responsible for managing virtual memory and translating virtual addresses into physical addresses. It allows the operating system to create the illusion of a larger, contiguous memory space than is physically available by abstracting physical memory limitations. Through the MMU, systems can effectively handle memory allocation, protection, and multitasking, enabling processes to run in their own isolated virtual memory spaces. This not only enhances memory utilization but also enhances memory protection and isolation by preventing processes from accessing each other’s memory directly.
RISC-V MMU
RISC-V is an open-standards ISA that offers scalability and customization through its modular architecture. Hence it is a popular choice for custom processors that can be used in a variety of applications, ranging from embedded to supercomputers. To help standardize this growth the RISCV ISA specification is adhered to; which offers a flexible range of options to implement different extensions for your system. This specification is further divided into two main parts: the unprivileged and the privileged document. The latter offers a detailed explanation of various privilege modes, additional registers and CSRs and also the Memory Management Unit (MMU).
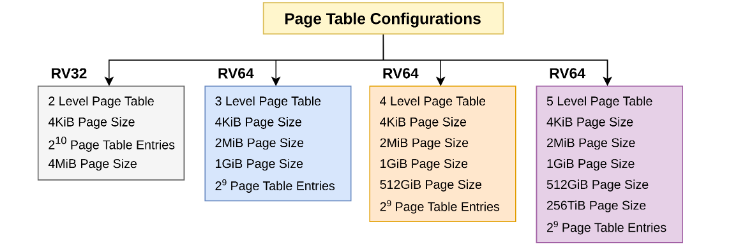
MMU takes up a huge chunk of the privileged specification offering many different flavors depending on the system under consideration.
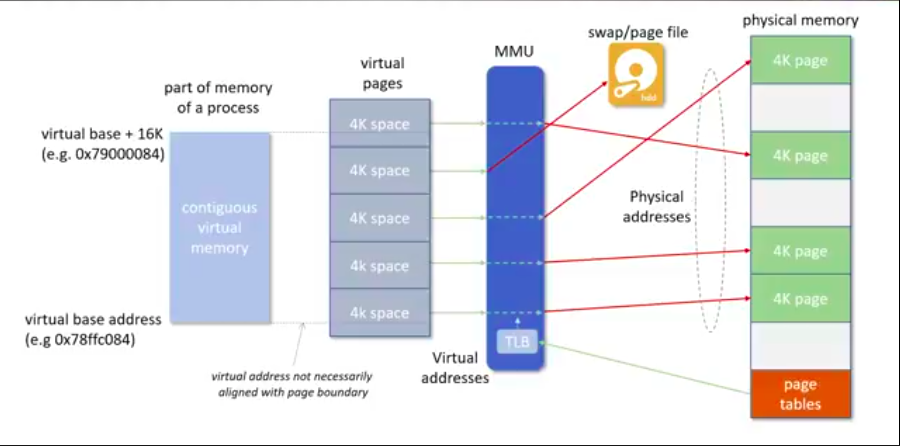
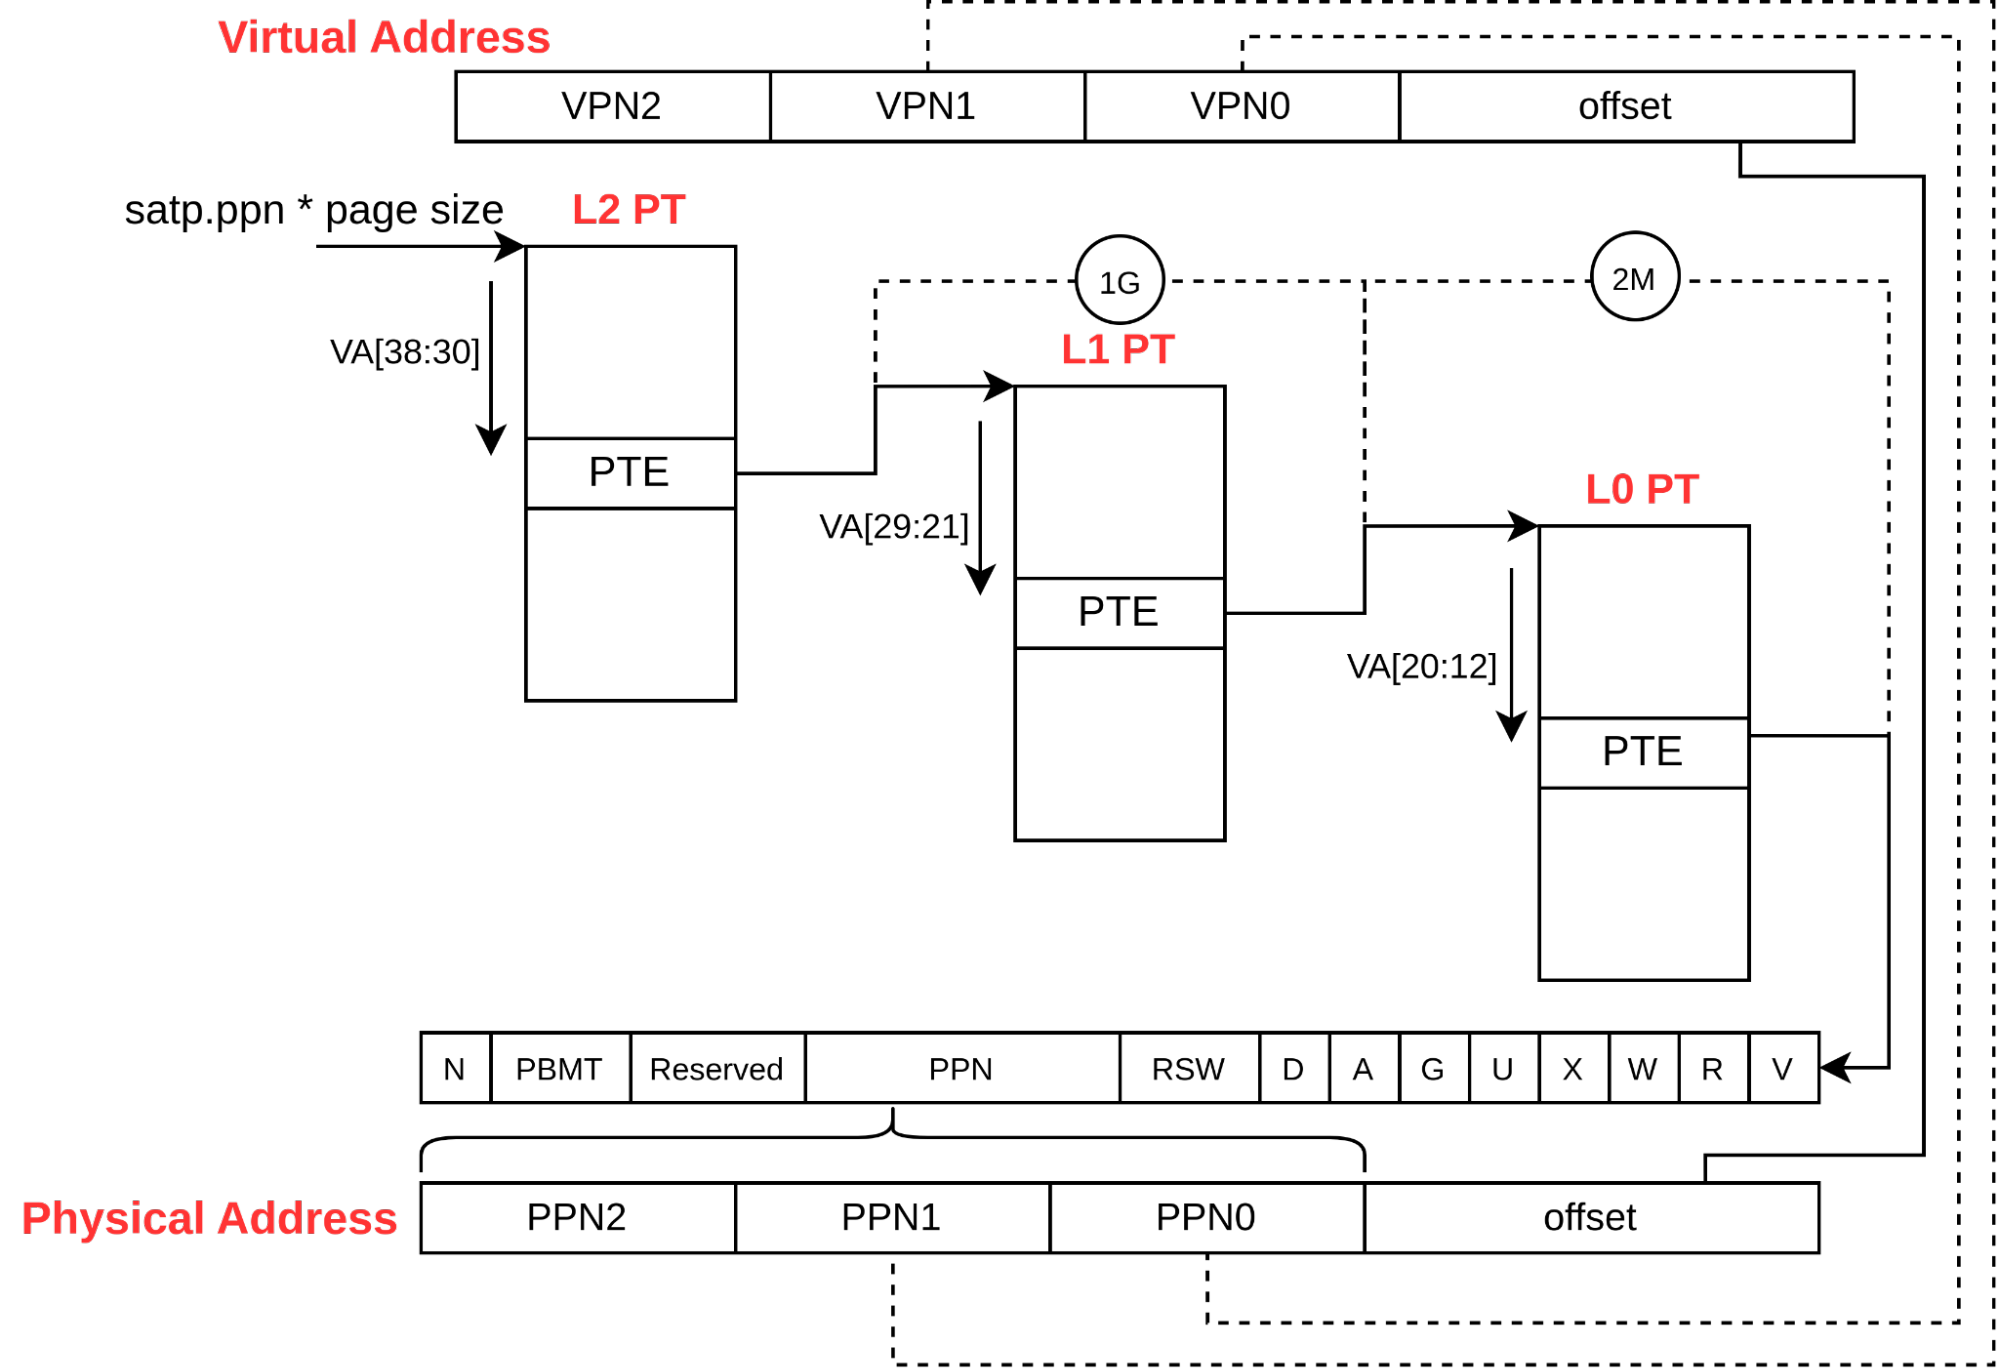
Major Steps involved in translation include Decoding the Virtual Address, Calculating the Base Address, Traversing Multi Level Page table, Evaluating the Page Table Entry (PTE) and finally handling Page Faults (if they occur). Following Image explains this behavior:
Furthermore, there are different extensions like Svade/ Svadu, Svinval, Svpbmt, Svnapot which target specific attributes of VM to provide even more customization. They affect either the A/D bits, the invalidation of TLBs, the memory attributes of associated memory pages or the NAPOT Translation Contiguity respectively.
Architecture Verification
Verification of MMU architecture requires a comprehensive approach to ensure correct functionality across all possible configurations and modes. The following steps outline key aspects of this verification process:
Test Planning
A single, unified test plan encompasses all MMU configurations and extensions. This includes verifying Virtual Memory (VM) permissions, especially the Page Table Entry (PTE) permission bits, across all page levels in both supervisor and user modes. The test plan addresses global mappings, toggling various VM extensions like Svadu/Svade, and ensuring that reserved bits and modes are handled correctly. It also covers the functionality of the satp register, which holds the root page table base address and the Address Space Identifier (ASID) used during context switching, with varying access permissions, modes, and Address Space Identifier (ASID) lengths. Furthermore, the test plan examines the behavior of the mstatus register by modifying bits such as MPRV and MPP (enabling virtualization in Machine mode), MXR (Make eXecutable Readable), SUM (allowing supervisor memory accesses to U-mode-accessible pages), and TVM (trapping otherwise permissible supervisor virtual memory management operations), while also validating the effects of SFENCE instructions.
Developing the Verification Environment
The verification environment is carefully constructed to support all necessary features for effective testing of the MMU’s architectural behavior, ensuring robust validation across all test scenarios. A key goal is to ensure thorough functional coverage, tracking the interaction of all critical components and verifying behavior across different MMU configurations and edge cases.
Two implementations will be discussed in the following sections, both utilizing the riscv-arch-tests with the sv32 MMU assembly tests to verify their designs. This suite comprised a total of 29 tests. However, the frameworks and coverage methodologies employed to ensure comprehensive functionality testing differ significantly between the two approaches.
The first implementation leverages the RISCOF Framework, using the RISC-V Spike simulator and the RISC-V Sail Golden reference model for cross-verification. in conjunction with coverpoints defined in YAML format using RISCV-ISAC. A total of 505 coverpoints were generated.
In contrast, the second implementation utilizes the open-source Imperas riscvISACOV platform with ImperasDV acting as a reference model. It also employs SystemVerilog (SV) coverpoints as the primary metric for functional verification. A total of 182 coverpoints were developed for sv32, and 215 for both sv39 and sv48.
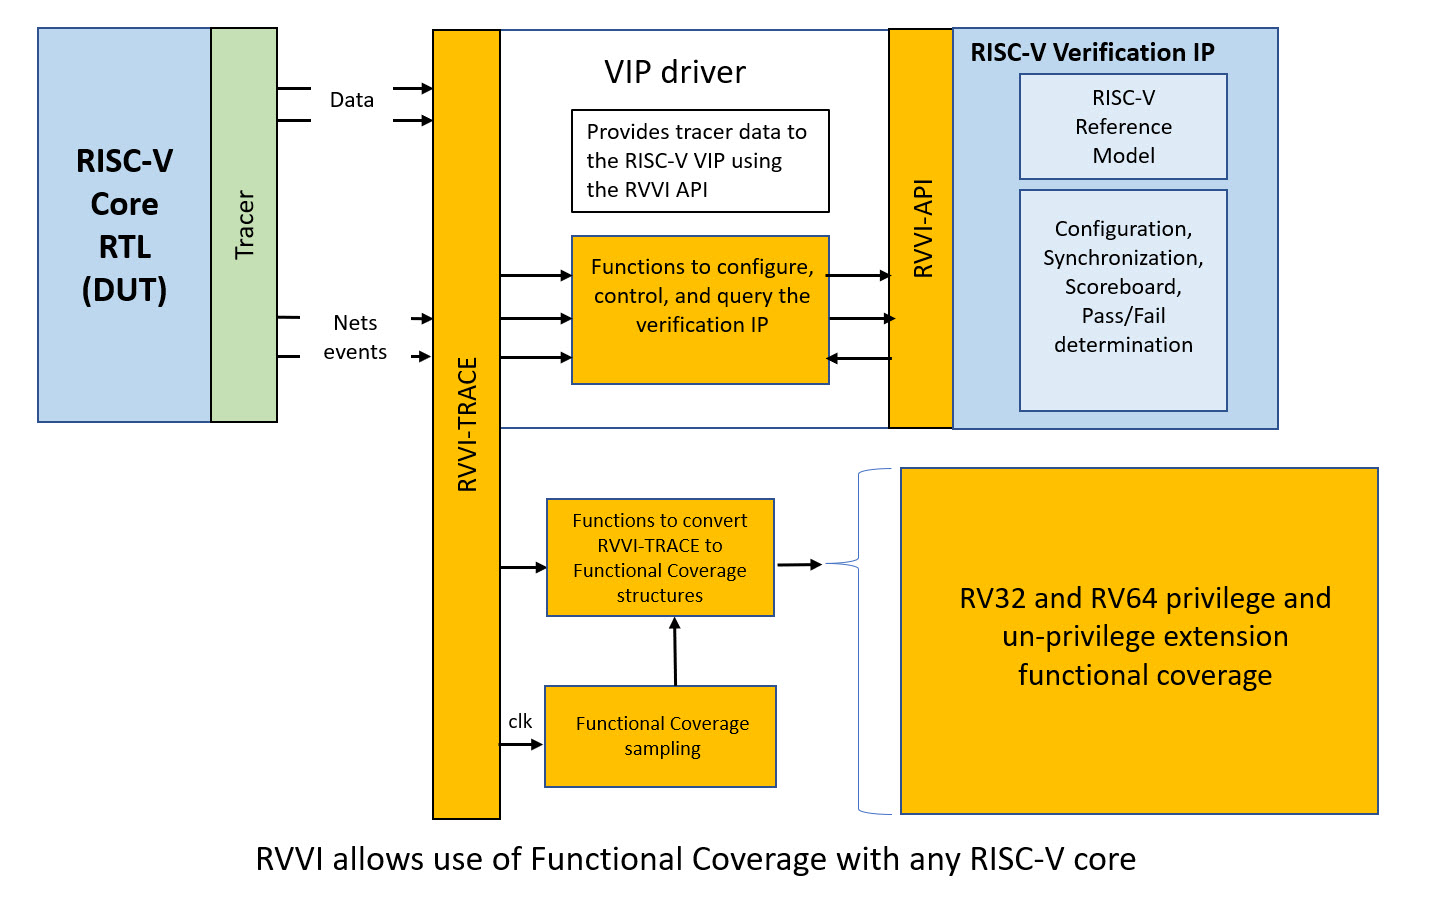
Implementing Imperas riscvISACOV Framework
By leveraging the open-source Imperas ISACOV platform, the coverage infrastructure is extended to include VM-specific functions, enabling more efficient tracking of verification progress. To enable more granular verification, key MMU micro-architectural signals—such asPage Table Entries (PTEs), Physical Page Numbers (PPNs), Virtual Addresses, Physical Addresses, Access Types (RWX), and Page Levels—are exposed to the interface. This facilitates accurate testing of translation and protection mechanisms. All privilege modes, page levels, PMP permissions, and memory accesses are thoroughly tested, ensuring correct permission handling, while respecting VM extensions and configurations. Critical architectural signals, including Control and Status Registers (CSRs), are sampled at the same pipeline stage by propagating the required signals, ensuring that the MMU behaves as expected under various system conditions. SystemVerilog coverpoints were implemented to leverage these functions for collecting functional coverage on VM tests. All of this has been implemented in Core-V Wally, to get a more in depth knowledge of its implementation visit CVW-Arch-Verif and CVW repos.
Compliance Testing with RISCOF
Introduction
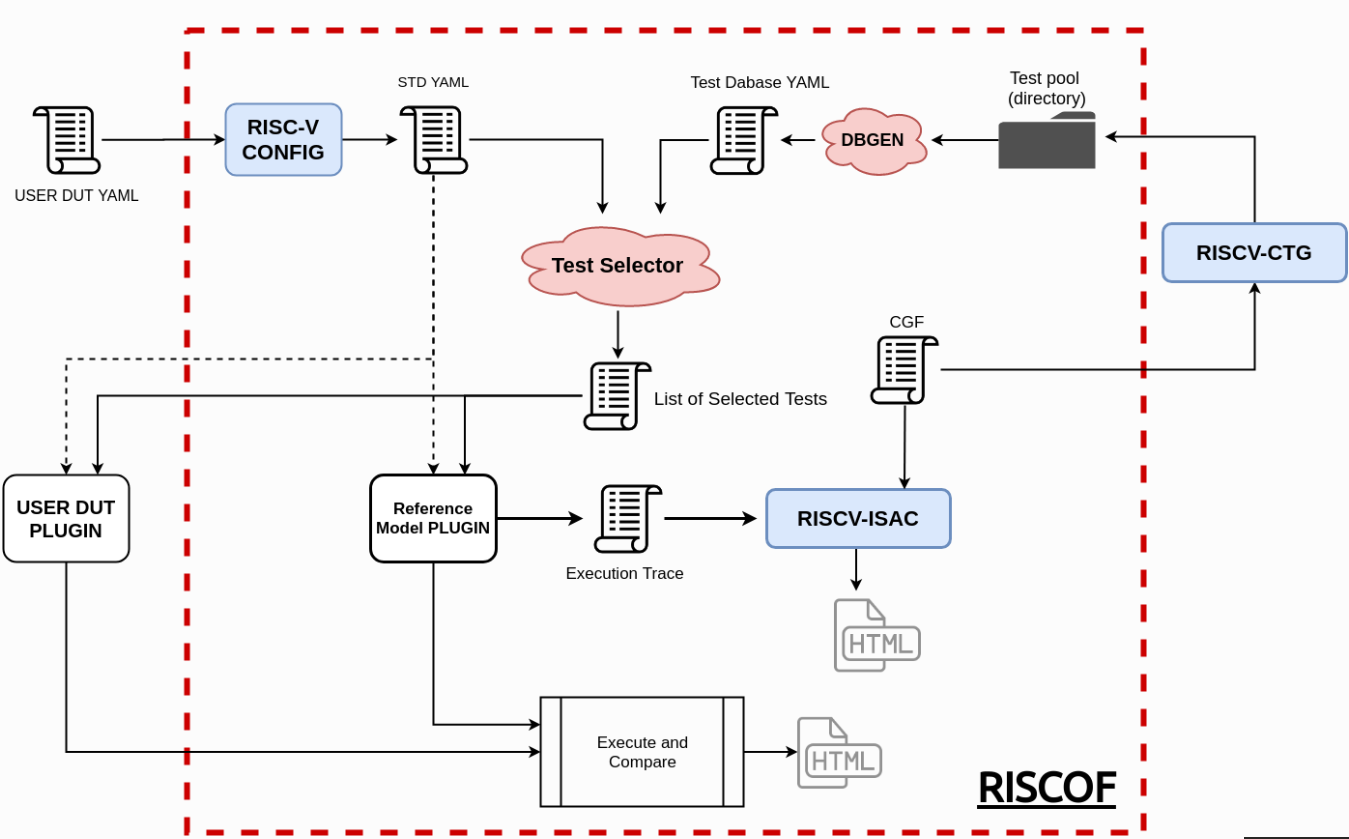
The RISC-V Compatibility Framework (RISCOF) is a Python-based tool for verifying the compliance of RISC-V hardware implementations against a golden reference model. It utilizes a suite of RISC-V architectural tests, often called Arch Tests, which are either generated by the Compliance Test Generator (CTG) or manually written. This verification ensures alignment with the RISC-V Instruction Set Architecture (ISA) specifications and compatibility using reference models, such as RISC-V Sail Model or RISC-V ISA Simulator (RISC-V Spike). The complete RISCOF flow is shown in the figure below:
Privilege Architecture in RISC-V: Challenges in Automated Testing
For the RISC-V unprivileged architecture, RISC-V CTG can generate architectural assembly tests using a predefined set of covergroups, accessible here (Later, in this article, we will also see how we define the covergroups for a test case). In the privileged architecture, however, test generation is more complex. Unlike unprivileged tests that focus on a single instruction, rather we have to write test cases for different features of the privilege architecture such as the Memory Management Unit (MMU) or Physical Memory Protection, which go well beyond using simply a single instruction. This complexity makes it challenging to generate these tests solely through covergroups.
To put this in perspective, consider a test case verifying the functionality of the “satp” as defined by the RISC-V Privilege Specification. Verifying this requires more than simply toggling a bit in a register or writing some data at a memory location. We must first configure a Page Table and then switch from Machine (M) mode to Supervisor (S) or User (U) mode to assess its correct operation.
Developing RISC-V Privilege Architecture Compliance Tests
Given the limitations of automated test generation for RISC-V Privilege Architecture, the compliance tests for this architecture must be written manually to address the complexity of privileged operations. This section details the methodology for developing a single test case as part of a larger effort to verify Memory Management Unit (MMU) functionality, specifically focusing on virtual memory verification for the SV-32 address translation scheme.
Test Plan Development
The testing process begins with a Test Plan development after reading the RISC-V Privilege Specification. This plan outlines all possible scenarios, or test cases, necessary to verify compliance. Each scenario is designed to confirm that the Device Under Test (DUT) adheres to the specified privilege behaviors. An example of the Test Plan is given below:

Test Case Goals and Steps
Let’s consider a single test case, namely the dirty bit test part of the SV-32 Virtual Memory Test Plan. The complete Test Plan can be found here with the architectural tests available here.
According to RISC-V Privilege Specification v1.12, if the implementation (hardware/DUT) does not set the dirty bit itself, a store-page-fault should be triggered when a PTE is written with the dirty bit set to zero. This requirement serves as the basis for our test case.

To write an assembly test, we must first define its objectives. The steps below outline the setup required to develop this test:
- Begin the test in M-Mode and configure a Page Table Entry (PTE) for the target region, referring to it as rvtest_data_1_l1 for the level 1 test case and rvtest_data_1_l0 for the level 0 test case.
- Configure the satp register with the base address of Sroot_page_table, selecting the SV-32 address translation scheme.
- Switch to Supervisor (S) or User (U) Mode, access the PTE, and verify that a store page fault occurs when attempting to write to it. For load and fetch accesses, no fault should be triggered.
The steps defined above are fairly generic and can implement a simple dirty bit test. However, when writing a RISC-V architectural test, we must follow a specific test structure outlined in the documentation available here. Therefore, let’s redefine our objectives:
- Define a macro, VERIFICATION_RWX, which will be used for all test cases to verify read, write, and execute permissions when given a single virtual address.
- Enter the main section. Then, ensure the existence of rvtest_mtrap_routine and rvtest_strap_routine. Use RVTEST_SIGUPD to update the test signatures; in RISC-V architectural tests, signatures are dumped to a predefined region rather than using self-checks.
- Define a Physical Memory Protection (PMP) region that covers the entire memory space and grants RWX permissions.
- Define virtual addresses for code, data, signature, virtual memory regions, and the test-specific regions.
- Set up Page Table Entries (PTEs) and reserved areas for code, data, root page table, and signature regions to guide the trap handler in identifying the return address after trap resolution.
- Configure the satp register with the base address of Sroot_page_table and select the SV-32 address translation scheme.
- For the test case, configure a PTE without dirty bit permission but with RWX permissions as shown below.
- Switch to Supervisor (S) mode using the TEST_CASE_RUNNER macro and check read, write, and execute cases using the VERIFICATION_RWX macro.

- After dumping the signatures, switch back to M-Mode. If additional test cases remain, return to step 7; otherwise, proceed to step 10.
- Exit the test, then run it on RISCOF, using Spike as the Device Under Test (DUT) and Sail as the reference model to confirm test accuracy.

Note: These steps were developed through an iterative process, so while alternative strategies may exist, this approach is well-suited for virtual memory tests.
Developing covergroups for the RISC-V Privilege Architecture Compliance Tests
As outlined above, in addition to developing tests, we define covergroups to monitor test coverage. Covergroups provide formal descriptions of the test cases listed in the Test Plan. To understand the pattern for defining a covergroup for a single test case, let’s consider a dirty bit test in S mode.
Test Case:
In this test case, we are going to verify if the hardware does not support the dirty bit update and then if the dirty bit is not set for a PTE, then we should expect a store page fault[1]. The following covergroup defines this test case formally.
a_bit_S_mode:
config:
– check ISA:=regex(.*32.*); check ISA:=regex(.*I.*Zicsr.*); def rvtest_mtrap_routine=True; def
rvtest_strap_routine=True;
mnemonics:
“{sw, csrrc, csrrs, csrrw}”
: 0
csr_comb:
# Check if the `satp` is active in Supervisor mode (S) and verify
that the SV32 paging scheme is configured.
‘mode == “S” and (satp >> 31) == ${SATP_MODE_SV32}’
: 0
# Ensure that the Physical Page
Number (PPN) of `rvtest_Sroot_pg_tbl` matches the lower 22 bits of the `satp` register when
`satp` is active.
‘((satp) & 0x003FFFFF) == get_addr(“rvtest_Sroot_pg_tbl”) >>
12’: 0
val_comb:
# LEVEL 1 Test Cases:
# Test Case 1: A bit set, D bit not set, RWX set –>
Store-page-fault, and the PTE should be updated.
‘mode == “S” and get_pte_prop(“AdRWX”, dptw1cont) == 1 and dptw0cont ==
None’
: 0
#Fault Checks
# Test Case 1: Store Page Fault.
‘mode == “S” and get_pte_prop(“AdRWX”, dptw1cont) == 1 and dptw0cont ==
None and mcause == ${CAUSE_STORE_PAGE_FAULT}’
: 0
Understanding how the coverage works:
Each covergroup is represented by its own label, a_bit_S_mode in our case. The assembly test written for this test case will define the covergroup label as well which will use this label for the coverage. Once RISC-V ISAC finds the covergroup for the test being used for the coverage, it verifies the ISA configurations defined under the config node. If none of the configuration matches, then, the covergroup is skipped.
mnemonics node:
The mnemonics node defines the set of opcodes for which the coverpoints are applicable. Since, in our case, we need to verify whether SV32 address translation is enabled in our test, we need to add csrrw, csrrs, csrrc under this label which are used for setting the bits for satp register. We use a virtual address for the physical address of the test section for which the PTE is set up without the dirty bit set, therefore, we will add sw opcode as well to verify we get a store-page-fault in the test. To summarize, we define the opcodes of the instructions which we want to target during the coverage under the opcode label.
csr_comb node:
This node defines the coverpoints for the control and status registers. In our case, satp register holds the value for the current address translation scheme mode and also the address of the root page table. Therefore, we verify the required conditions for satp under this node. ${SATP_MODE_SV32} is a format for constants/macros. The value for this macro is defined in the yaml format in a separate file which is passed along with the covergroups which replaces the macros with the defined values before running the coverage.
val_comb node:
This node defines the coverpoints/combination for the register values. In our case, as we understood above, we want to verify that the test sets a PTE with permissions such that the dirty bit is not set. Additionally, we want to verify that if there exists a PTE with no dirty bit, then, there should be a store-page-fault as well. There are multiple functions defined for different nodes to make the coverpoint writing process simple. One of its examples is get_pte_prop(“AdRWX”, dptw1cont). This function is defined in RISC-V ISAC which takes a PTE and then extracts the lower 10 bits for the given PTE. We have passed the dptw1cont which contains the value for the data page table walk at Level 1[2]. After extracting the lower 10 bits, it verifies that bits mentioned in Upper Case are set for that specific PTE and NOT set for the bits mentioned in Lower Case.
Translator Feature in RISC-V ISAC
Recently, a new feature has been introduced in RISC-V ISAC. You may have noticed curly brace {} around the instruction names defined under the mnemonics label. This feature is meant to reduce the number of lines for defining a covergroup, therefore enhancing the readability. The complete RISC-V ISAC flow is given below:
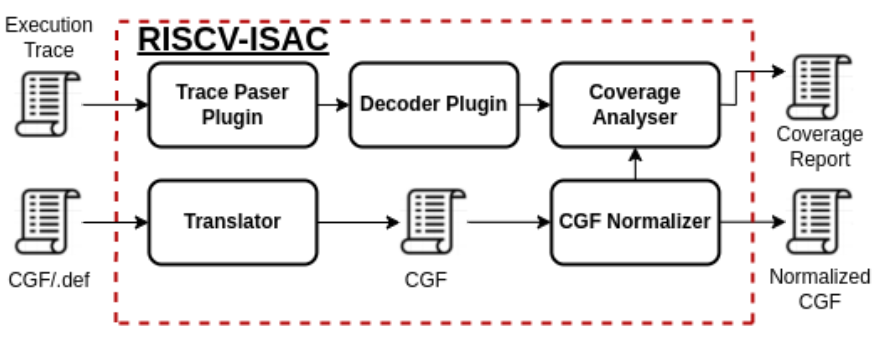
Therefore, the covergroups are first passed through the translator which translates all the coverpoints defined using curly braces. Then, the translated covergroups are passed to the normalizer to further remove the macros and create a normalized CGF. In our case, the coverpoint {sw, csrrc, csrrs, csrrw} will be translated to four separate coverpoints. To understand more about the translator feature, please refer to the official documentation of RISC-V ISAC.
References
[1] RISC-V Foundation. RISC-V Privileged Architectures Manual, Version 1.12. Accessed: 2025-01-27. 2021. url: https://github.com/riscv/riscv-isa-manual
[2] RISC-V Software Source. RISCOF: RISC-V Architectural Compliance Framework. Accessed: 2025-01-27. 2025. url: https://github.com/riscv-software-src/riscof
[3] OpenHW Group. CVW: Core Verification Workflows. Accessed: 2025-01-27. 2025. url: https://github.com /openhwgroup/cvw
[4] RISC-V Verification Group. RISC-V ISA Coverage Analysis Tool (riscvISACOV). Accessed: 2025-01-27. 2025. url: https://github.com/riscv-verification/riscvISACOV
[5] RISC-V Foundation. RISC-V Architecture Test Framework. Accessed: 2025-01-27. 2025. url: https://github.com/riscv-non-isa/riscv-arch-test
[6] OpenHW Group. CVW Architectural Verification. Accessed: 2025-01-27. 2025. url: https://github com /openhwgroup/cvw-arch-verif
[7] Synopsys. ImperasDV – RISC-V Processor Design Verification. Accessed: 29-Jan-2025. 2025. url: https://www.synopsys.com/verification/imperasdv.html
[1] This test is based on RISC-V Privileged ISA version 1.12, which does not include SVADE and SVADU support.
[2] To maintain brevity, this test verifies the dirty bit functionality at Level 1 only. The logic can easily be extended for Level 0 as well in case of SV-32 address translation scheme.